In this blog post, we will go through the process of setting up a video surveillance system for your home, based around our macOS CCTV software SecuritySpy. When setting up a home CCTV system, cost is an important consideration, but we also want to choose high-quality hardware that is easy to install and set up. To this end, our example system will comprise the following components:
Cameras: we have chosen to use Amcrest IP8M cameras for the following reasons:
- Physically quite small and unobtrusive.
- Easy plug-and-play setup (no manual IP/network setup required).
- High resolution (8 MP), night vision, and good codec support (H.265 and AAC).
- A built-in microphone – essential for a camera covering an entrance.
- Great value at around USD $100.

Four cameras should effectively cover the outside of a typical house: one at the front door, one covering each side, and one at the rear. These particular cameras (like many other Amcrest models) come with either a 2.8mm or a 3.6mm lens, the former being more wide angle. Which one you go for depends on how far the camera will be from the area you want to capture. For example, a camera just above the front door should use a wide lens such as a 2.8mm, whereas one mounted high on a wall would benefit from a longer lens such as a 3.6mm or more.
Ethernet switch: a simple unmanaged Gigabit switch with 8 ports is sufficient for this installation. Unmanaged means that the switch doesn’t have any settings of its own – it’s truly plug-and-play. In addition, we’ll need a switch that provides Power-over-Ethernet (PoE), in order to power the cameras without running extra power cables – this makes installation much easier. The Netgear GS108LP fits the bill: it’s a reliable, inexpensive, 8-port switch that can provide power from all its ports (many PoE switches only supply power from a subset of their ports, so this is something to watch out for).

Ethernet cabling: go for “Cat6 UTP” Ethernet cable, which you can buy cheaply on a reel, and buy some some RJ45 connectors. For the cable installation, we recommend you hire an electrician, as this is the hardest part of the whole project. However, if you want to do it yourself, you will also need an RJ45 crimp tool to attach the connectors to the cable.

You may be tempted to go for WiFi cameras instead of wired Ethernet cameras, but we would strongly advise against this, especially for outdoor cameras. WiFi is not robust enough, due to signal strength and interference issues, and you will end up with a far less reliable system.
Tip: use pure copper cable rather than coper-covered aluminium (CCA) cable. Pure copper costs a bit more but is far superior.
Mac: a basic Mac mini has more than power enough to run four cameras, with plenty of horsepower to spare in case you wanted to add more cameras in the future, or use the Mac mini for something else at the same time. As this is the most expensive item, you could cut costs here by opting for a second-hand Mac mini (from eBay, for example). Use our SecuritySpy System Requirements Calculator to determine which Mac hardware is suitable for the system you are planning.

Storage: use an external hard drive connected by USB 3 or Thunderbolt. These are inexpensive, and one drive can provide all the storage space you need. Our SecuritySpy System Requirements Calculator will give you an indication of the storage requirements based on camera resolutions and frame rates, recording settings, and how long you want to retain footage for. In most cases, a 2 TB drive will provide plenty of storage for a system of up to 10 cameras or so, and for the best speed and performance, you should use an SSD rather than a HDD (but, if you go for a HDD, make sure to use a 3.5-inch “desktop” drive, as these perform better than smaller 2.5-inch “portable” drives).

Budget
Here is an approximate breakdown of costs, in US dollars:
| Mac mini with M2 chip | $600 |
| Cameras (4x $100) | $400 |
| Ethernet switch | $100 |
| External hard drive | $100 |
| Cable | $40 |
| SecuritySpy 4-camera software license | $115 |
| TOTAL | $1355 |
Layout
Your main Ethernet switch is the central hub of your network – all network devices should be connected into it, as shown here:

Note that your router may itself have multiple Ethernet ports. If you have a high quality router (like the Apple AirPort Extreme shown here) these ports are safe to use, in order to connect other Ethernet devices if you need to. However, if you are using the free router provided by your Internet Service Provider, we would advise against using its extra ports, as these devices tend to be of variable quality and should not be trusted to be a reliable part of your network.
Setting Up the Cameras in SecuritySpy
Once everything is connected together, install and open the latest version of SecuritySpy. Then, follow these instructions to add the cameras to SecuritySpy. The cameras should be automatically detected, so it should be easy to add them (click the Auto-Discovered Devices button in the setup screen shown below). Here is a screenshot to demonstrate their setup in SecuritySpy:
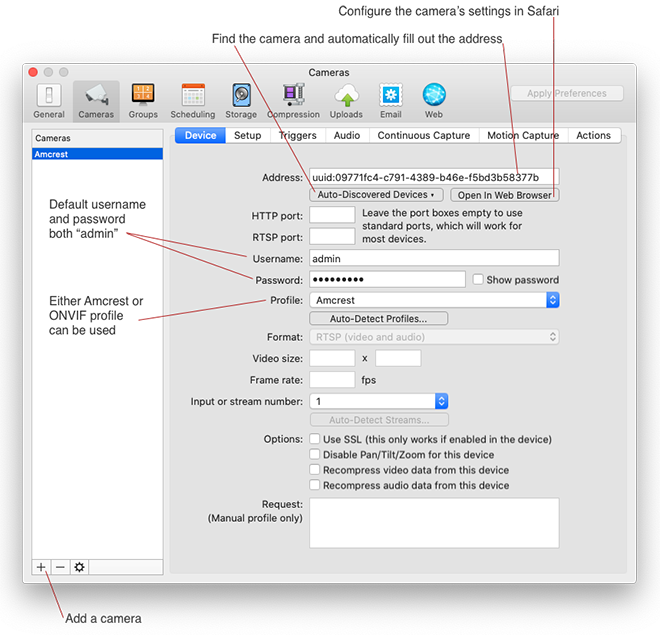
Click the Open In Web Browser button to adjust the camera’s settings, and set the following options (settings on non-Amcrest cameras should be similar):
- The camera will initially ask you to set a more secure password, so once you do this, make sure to then enter this into SecuritySpy for the camera in question.
- Set the video encoding to H.265, and the audio encoding to AAC.
- Set the frame rate to somewhere between 5-10fps, depending on your requirements.
- Set the bit rate type to VBR (Variable Bit Rate).
- Set the encoding quality to a medium-high setting (level 4 or 5 for these particular cameras).
- Set the correct date and time. Look for an option to enable the use of a NTP server (this is an Internet Time server that will keep the cameras to the correct time), and provide the address time.apple.com for this.
Then, to enable motion-detected recording for your cameras, set their Motion Capture schedules to Armed 24/7. This is explained in the Schedules section of the SecuritySpy User Manual. You can do this via the Control menu at the top of the screen, via the Camera Info window, or by right-clicking on a camera’s video feed.
Here is a screenshot from our example system, showing all four cameras set up and ready for motion-detected recording:

Further Reading
The above is enough to get you started with basic settings in place, but SecuritySpy has many configuration options and additional features that you will probably want to explore in order to get the most out of your system. Here are some further resources:
- Actions allow you to set alarms and notifications when motion is detected.
- Remote Access allows you to monitor your CCTV system over the Internet.
- Our iOS and tvOS apps allow you to view your system on your iPhone, iPad or AppleTV.
- You may want to set up SecuritySpy for autonomous operation.
- Read about how to achieve effective motion detection, and how to optimise SecuritySpy’s AI object detection features.
I know the breakdown of costs specifies hardware but surely such a list should include a securityspy license.
Good point, we have now added this above. Thanks for your feedback.
I’ve been reading that the ethernet cables (for PoE applications in particular) ought to be pure copper, as opposed to CCA (copper clad aluminum). This distinction more than doubles the cost of cabling, but I thought it ought to be worth a mention.
Also, the Mac mini pricing could probably be updated. 😉
You are correct – pure copper cables are definitely superior to CCA cables, this is worth mentioning in the post so we will add this – thanks for adding this information!
Yes, the post was written a few years ago and some of the products and pricing are out of date, we’ve just updated this with 2024 products and pricing.