The usual way to set up remote access to our CCTV software SecuritySpy running on your Mac is via port forwarding (see Installation Manual – Remote Access). This method allows direct incoming connections to SecuritySpy from the Internet, and is achieved by configuring your router (which SecuritySpy can do automatically for most routers). This method is great for most users, as it usually allows high-performance remote access with minimal configuration.
However, some users may want to consider other methods for the following reasons:
- Port forwarding only works when your ISP gives you a true public IP address, which is not always the case, especially with cellular or satellite internet connections (e.g. 4G, 5G, Starlink).
- If you have two routers between the Mac and the Internet (e.g. your ISP router plus your own router), port forwarding configuration is difficult – the usual solution is to switch one of these routers to bridge/passthrough mode, but this isn’t always possible.
- ISP routers sometimes prevent users from setting port forwarding rules.
- Institutions with very strict network policies may have a blanket ban on allowing any kind of incoming connections from the Internet.
If you can’t use port forwarding for any reason, the solution is to set up a Virtual Network or a Tunnel (sometimes called a proxy) via a third-party service in order to access your system. A number of these solutions are described below, with setup instructions.
A Virtual Network, as opposed to a physical network, is a Software-Defined Networking (SDN) solution that creates an overlay network on top of existing network infrastructure, spanning across multiple physical networks and the Internet. Members of this virtual network can communicate with each other as if they were on the same physical network.
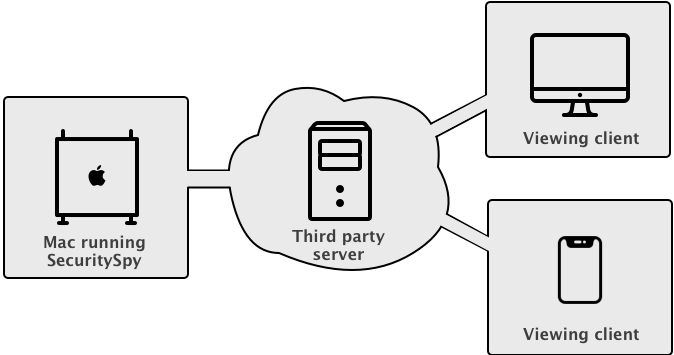
With a Tunnel solution, the data is relayed via a third-party server acting as an intermediary. Note that many providers apply data transfer limits, so you should take steps to moderate your bandwidth usage when accessing remotely, such as minimising live video streaming, avoiding large file downloads, and generally using the connection sparingly.
Which solution you choose generally comes down to the following question: do you have a fixed set of devices from which you want to access your SecuritySpy server? For most users, the answer to this question is yes, and in this case a Virtual Network is the best solution. On the other hand, if you want your SecuritySpy server open to the Internet for anyone to (attempt to) access, then a Tunnel solution provides this.
In terms of security, both solutions offer encrypted Internet communication, however the Virtual Network solution is considered more secure because clients have to first be a member of the network in order to even attempt connections to the server, which adds an extra layer of security. Note that in either case, the connection to SecuritySpy itself is via its plaintext HTTP web interface (not the secure HTTPS interface), so this must be enabled in SecuritySpy’s web settings. This is because the encryption is handled by the virtual network / tunnel solution itself, not by SecuritySpy.
Virtual Network (SDN) Solutions
Client software is installed on all devices, allowing them to communicate freely with each other as if they were on the same physical network. The system assigns each device a virtual IP address. Devices are only accessible to others within this virtual network, not from outside. The central server primarily helps set up direct connections between devices, rather than relaying data itself.
To configure SecuritySpy for use with a virtual network solution, simply enable the HTTP web server and add a user account to provide password protection, like this:
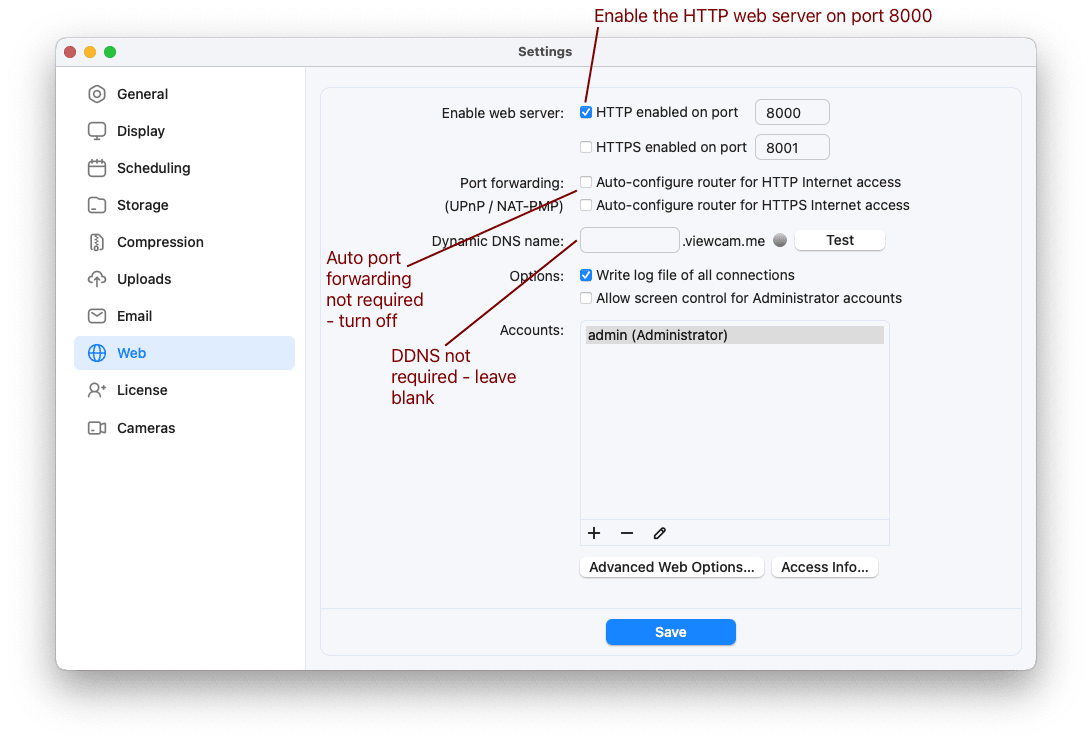
These are the required Web settings in SecuritySpy for use with a virtual network solution like ZeroTier or Tailscale
Virtual Network Solution 1: Tailscale
- A basic account that connects up to 20 devices is free
- Easy setup with great Mac support
- Client authentication is done via account details: each client needs to log in to your Tailscale account, or their own Tailscale account to which you can share devices
- All major platforms supported (macOS, iOS, Windows, Linux)
1. On the Mac running SecuritySpy, sign into Tailscale using a Google, Microsoft or GitHub account, and follow the instructions to download and install their app from the Mac App Store.
2. Open the app, agree to the required permissions that you will be asked for, and log in.
3. During the setup process you will be asked if Tailscale should start automatically – assuming you want SecuritySpy to be accessible at all times, select this option.
4. You should see a Tailscale menu in the top-right of your Mac’s menu bar – it looks like this:![]() This menu shows the virtual IP address that has been assigned to your Mac, for example:
This menu shows the virtual IP address that has been assigned to your Mac, for example:
5. On any device from which you wish to access SecuritySpy, install Tailscale, log in using the same account, and you will be able to access SecuritySpy using the Mac’s virtual IP address as shown in menu above, along with the HTTP port that SecuritySpy is using. In this example, the URL for access would be http://100.125.35.86:8000
Note that this looks like an insecure connection to the client, however Tailscale is automatically encrypting all data in the background, so it’s actually secure.
Virtual Network Solution 2: ZeroTier
- A basic account that connects up to 25 devices is free
- Easy setup with great Mac support
- Client authentication is done via the central control panel; clients don’t need account details
- All major platforms supported (macOS, iOS, Windows, Linux)
- macOS support all the way back to High Sierra (10.13)
1. Head to ZeroTier and sign up for an account, or log in with an existing Google, GitHub or Microsoft account.
2. Click the Create A Network button, and a virtual network will be created for you – make a note of the Network ID that will be displayed. You can choose a custom name if you like.
3. On the SecuritySpy Mac, and on all other devices you want to connect to your virtual network, download and open the ZeroTier app. You will see its menu in the top-right of your Mac’s menu bar – it looks like this:
![]()
This menu has the following options:

Select the Join New Network option, and enter the Network ID that you obtained from step 2. You should then see the network displayed in the menu (called SecuritySpy in the above example). Repeat this on all devices.
4. In the Networks section of the ZeroTier web portal, click on the network to edit it, and scroll down to the Members area. You should see a list of devices that you have connected, but they will not yet be authorised. Enable the checkboxes next to each device to authorise them:

5. You will see here that each device has been assigned an IP address on the virtual network (shown under Managed IPs in the above screenshot). This address is also displayed in the ZeroTier menu under Network > Managed Addresses. This is the address that you will use in clients in order to access your SecuritySpy server. In the above example, the SecuritySpy Mac has the virtual IP address 172.29.211.179, so clients can access SecuritySpy at the URL http://172.29.211.179:8000
Note that this looks like an insecure connection to the client, however ZeroTier is automatically encrypting all data in the background, so it’s actually secure.
Tunnel / Proxy Solutions

Client software on the SecuritySpy Mac makes an outgoing connection to the proxy server. The proxy server accepts incoming connections from any device on the Internet, which are relayed to the SecuritySpy Mac.
Tunnel Solution 1: Pagekite
- Reasonable fees (e.g. $60 gets you 1 year with 200 GB data quota)
- Extremely easy setup
- A domain name is provided; you do not need your own
- Restrictive data transfer limits mean that this is only suitable for light/infrequent use
1. Setup is as easy as opening a Terminal window and executing the following two commands in turn – the first downloads the pagekite script, and the second starts the tunnel (choose a name that is meaningful to you, rather than yourname):
curl -O https://pagekite.net/pk/pagekite.py

python3 pagekite.py 8000 yourname.pagekite.me
When you start the tunnel for the first time, follow the account creation and setup prompts – this only has to be done once. Your SecuritySpy server will then be accessible at the secure URL https://yourname.pagekite.me
2. To have the tunnel start automatically when the Mac boots up:
- Open TextEdit and create a new document
- Under the Format menu, select the Make Plain Text option
- Copy into the document the second command from above (the one that starts python3…)
- Save this to your Documents folder using the file name pagekite.command
- Open a Terminal window and execute the following command to make this file executable:
chmod +x ~/Documents/pagekite.command
- Go to System Preferences > Users & Groups > Login Items, click the padlock item to unlock the settings, and drag the pagekite.command file into the list of login items.
3. Note that the Terminal window that is running pagekite must be left open for the tunnel to be operational.
Tunnel Solution 2: Packetriot
- A free account provides a randomly-assigned (but permanent) domain and 1 GB monthly data, or a basic account at $5/month gives you a reserved domain and 1 TB monthly data
- Moderate setup difficulty; not very user-friendly
1. Head to Packetriot and create an account using an email address and password (don’t login via an existing Google account, as this makes configuration a bit more difficult).
2. From the Download pages, under the Manual Downloads section, download the macOS package. This downloads a folder that contains two important files: a pktriot executable, and a pktriot.plist file that can be used to start Packetriot automatically at system reboot.
3. Right-click on the pktriot executable, select the Open option, and click the Open button. This authorises the executable to be allowed to run, and only needs to be done once.
3. In a new Terminal window, enter the following commands in turn, each followed by the return key:
cd ~/Downloads/pktriot-0.14.1 (or whatever the path is to the pktriot folder you just downloaded – your version number may be different)
mv pktriot.plist /Library/LaunchAgents (do this only if you want Packetriot to start automatically upon Mac reboot)
mv pktriot /usr/local/bin (this moves the pktriot executable to the right place)
cd /usr/local/bin (this sets the directory in Terminal in preparation for running the below commands)
sudo mkdir -m 777 /etc/pktriot (this creates a folder for the Packetriot settings file – you will be asked for your macOS user password)
./pktriot configure
This takes you through some configuration options, including login details, region, and configuration file location, for which you should choose the path starting /etc (option 1).
4. For paid accounts, under Subdomains in the control panel, you can reserve and assign a subdomain to your tunnel – for example yourname.pktriot.net. Otherwise, for free accounts, check the Tunnels page to see what domain has been automatically assigned to your tunnel.
5. The following commands configures and starts the tunnel on your Mac (make sure to substitute in the correct domain for your tunnel, which is your custom subdomain if you have reserved one):
./pktriot tunnel http add --domain yourname.pktriot.net --destination localhost --http 8000 --letsencrypt
./pktriot start
You should see some output in the Terminal that indicates that the tunnel has started, like this:

This indicates that your SecuritySpy server is now available to the Internet at the URL https://yourname.pktriot.net
6. Since you started the tunnel here manually, it will only persist while this Terminal window is open. If you copied the pktriot.plist file to the /Library/LaunchAgents folder as described above, simply reboot your Mac and the tunnel will start automatically without requiring to be run in a Terminal window.
7. Other useful commands that will help when changing tunnel names or debugging are as follows:
./pktriot info (shows information about the current configuration)
./pktriot check (checks for setup problems and prints and short report)
./pktriot tunnel http rm --domain yourname.pktriot.net (removes a tunnel)
Tunnel Solution 3: Cloudflare
- A basic account is free and offers lots of great features (described as “For personal or hobby projects that aren’t business-critical”)
- You will need your own domain name – for many users this is ideal, but for others this adds unnecessary complexity
- Moderate setup difficulty; knowledge about how domain names and DNS work would be useful
- There are no published usage limits, but we would expect Cloudflare to ban users who they consider to be abusing their free accounts (e.g. with constant video streaming).
1. Register a domain name of your choosing via any registrar (we can recommend namecheap.com in the US and names.co.uk in the UK).
2. Sign up for a Cloudflare account – when asked, choose the free option.
3. Follow Cloudflare’s instructions to add your domain to your Cloudflare account. By default, Cloudflare will copy the domain’s existing DNS configuration, so make sure to remove any records that you don’t need, as these may conflict with the tunnel you are about to create.
This also involves setting the nameservers (DNS servers) on your domain to Cloudflare’s servers, which is done via the control panel provided by your domain name registrar. You may have to wait 24 hours after this step for the new nameserver setting to take effect on your domain.
4. Open the Cloudflare Zero Trust Dashboard. In the menu on the left, select Access > Tunnels, and create and name a new tunnel. Once created, you will see a section called Install and run a connector, which contains some commands that you will need to copy and paste into a Terminal window on your Mac.
Installation will take a few minutes, during which time you will be asked for your Mac password in the Terminal window and in some windows that pop up during the install process. Once installed, the connector should show up at the bottom of the page in the web browser. Here’s what this window should look like if everything went well:

5. Click the Next button, and you will then be asked for some options, as follows:
- Domain – select the domain that you added to your Cloudflare account in the step above.
- Subdomain – you can choose any subdomain you like as the endpoint of the tunnel (e.g. cameras.example.com), of you can leave this blank to have the domain itself point to SecuritySpy (e.g. example.com). In either case, Cloudflare will automatically add the relevant DNS entries to your domain, but it can only do so if there aren’t any existing entries that conflict – if you get a warning here, edit the DNS configuration for your domain in Cloudflare to remove conflicting entries.
- Path – leave blank
- Type – HTTP
- URL – localhost:8000

6. Your SecuritySpy system should now be accessible via the address you set up in the above panel, which in this example is https://cameras.bensoftware.com
I believe your diagrams for Tailscale and Zerotier are misleading a bit?
Both of these solutions are not a pass-through VPN where all the traffic flows through their central server.
Instead, these are peer-to-peer VPN’s, once the session is established, the client computer is directly communicating over the Internet via an encrypted peer to peer connection to the destination Mac (running SecuritySpy) without traffic passing thru the hosted servers.
The central servers used by Tailscale or Zerotier are only connection setup servers. They facilitate setting up the connection without problems imposed by no port forwarding and the need to traverse NAT type firewall/gateways at each end.
Hi Robert, thank you for this, you are indeed correct, we will update the post accordingly.
I am about to switch from my internet provider to Starlink. It appears that I will get ipv6 address. Would I still need to use one of the above methods to get back to my SecuritySpy, or would the Port Forwarding method be applicable?
Thanks for the interesting article.
Public information about whether this is supported seems to be mixed, and I can’t tell for sure whether this will work. It’s best to ask Starlink this – you’ll need to know whether the router they supply will distribute public static IPv6 addresses to connected devices, and forward incoming connections from the Internet to these devices. Certainly, SecuritySpy supports IPv6 connections.
But I can say for sure that either of the VPN methods described in this article will work over Starlink, so this could be the best solution for you.
Thank you for your response to my comment. I am intrigued by the possibility of making Security Spy app on my phone reachable via application of IPv6 addressing. I finally got Starlink; I had it initially set up for testing with the Starlink router. I was able to confirm using whatismyip.com that I was getting an IPv6 address. It does not seem to be a static address. Although the first 16 characters of the address remained the same in all checks, the last 16 do change. I have disconnected the Starlink router from the Starlink’s PoE injector, and connected the injector directly to my router (Amolifi HD) with the Ethernet cable supplied by Starlink. A few minutes after powering back both the PoE injector and the Amplifi HD router, everything was back to normal except for Security Spy. Using my iPhone, which was disconnected from WiFi, I was able to reach Nest thermostats in my hose as well as the Z-wave door locks and light switches, which are controlled with the Vera app. Clearly, both Vera and Nest have built/in technologies that allows them to reach back to the devices inside the house. These technologies do not seem to be affected by the use of CG NAT by Starlink.
At first I could not detect my public IPv6 address after switching to the Amplifi HD router. Once I toggled the IPv6 switch to On in the router’s settings and selected DHCP6, whatismyip.com could again detect my public IPv6 address. Unfortunately, I was still unable to reach my cameras (SecuritySpy server on my Mac) with the SecuritySpy app from my iPhone.
It has been rather straightforward to set up static private IPv4 address for the Mac, which running SecuritySpy. On my Mac I, changed “Configure IPv4” from Automatic to Manual. After that I selected the IP Address, Subnet Mask & and Router, and I was done. I had to tinker with Port Forwarding, but that was essentially it.
I did a similar thing with IPv6 address under the Advanced Settings in the TCP/IP tab. I selected Manually, and the Router, IPv6 Address & Prefix Length fields got automatically populated. After applying these setting, I am still unable to reach the server from my iPhone.
In the SecuritySpy preferences Web tab I get a green light after testing the Dynamic DNS name that have been using. Clearly I am missing something.
This is more request for assistance than a comment, so please treat it accordingly.
Hi Drew, with IPv6, the ISP will assign you an IPv6 prefix – i.e. the first part of the IPv6 address – that doesn’t change each time you connect. What the router is supposed to do is to use this prefix to distribute IPv6 addresses to LAN clients, where the prefix is always the same but the last bit of the address varies for each device. These should be true public addresses that are accessible from the Internet BUT this depends on the router (it may be set to block incoming connections by default), and also on the ISP (it’s not clear whether Starlink allows incoming connections).
Devices like Nest work differently, in that they achieve outside access by making outgoing connections to Nest’s Internet servers. When you use the Nest app, you are connecting to a Nest Internet server, not directly back to your thermostat. The advantage of this method is that it doesn’t require incoming connections into your network, but the disadvantage is that your data is flowing through someone else’s server so it’s not good for privacy, and if Nest goes out of business then remote access will stop working. Also, it requires the maintenance of expensive server infrastructure – CCTV/camera systems that use this method all charge their users monthly/yearly fees to use this kind of service.
By contrast, SecuritySpy uses port forwarding, which can sometimes be a bit more tricky to set up, but it has the significant advantages of better privacy, no ongoing costs, and no reliance on server infrastructure that may or may not exist in the future.
I would advise you check the router’s firewall – most likely you’ll have to specifically tell it to allow these connection. Also, try connecting from a web browser in addition to our iOS app just in case there is an issue here (but our iOS app does support IPv6 so this seems unlikely). If this doesn’t work then I think one of the VPN solutions described above is the way to do.
Thank you for replying. I have set up ZeroTier network, and it is working. My wife, unfortunately, does not like this solution, as she needs to use web browser to look at the cameras, as opposed to Security Spy app for iPhone, which she likes better than all “the fluff” on top of just looking at the video stream. Perhaps SecuritySpy app could be configured with ZeroTier-supplied ipv4 address for the Mac running SecuritySpy? (I haven’t tried that yet.)
On the Starlink front, I have read somewhere that Starlink uses 56 bit prefix for IPv6 addressing. I have changed the default 64 bit prefix on the manual IPv6 configuration setup of the Mac to 56, I configured my Amplifi HD router to allow incoming IPv6 connections, I have typed into the browser of my iPhone the ipv6 address the SecuritySpy Mac, and I have been presented with the credentials page of the server. So far so good. (BTW, I was disconnected from the WiFi network, as well as from Zero Tier VPN. I was on the cellular data connection when testing.) The above works without hiccups when making http://[…]:8000 connection. When I tried https://[..]:8001 address, Safari browser worked me that this website could be impersonating a real server and I should disconnect. Once I clicked that I understand the risks, I was able to get in.
Unfortunately, I do not know how to set up SecuritySpy app on the iPhone with the IPv6 address. So I am at the same place as with ZeroTier, except I experience faster connections with the use of IPv6 addressing. Isn’t DNS, as set up in Web tab of the SecuritySpy, supposed figure out not just the IPv4 address but IPv6 as well? (Perhaps it takes a while to update the server name with the correct IPv6 address? Maybe I need to check it again tomorrow .) I am looking forward to your comments.
Yes, the SecuritySpy iOS app can be supplied with the ZeroTier IP address. Simply add the server manually using this address.
Your Starlink results are interesting, and indicate that the Mac is getting an IPv6 address that is indeed available publicly. Unfortunately, it seems that our iOS app cannot currently accept IPv6 addresses, and our DDNS system is IPv4-only at this time. We will work on these issues in order to expand IPv6 support in the future, however for now I think the way forward for you will be to use ZeroTier.
so, is Cloudflare Zero Trust and not Cloudflare tunnel?
Hi Rick, tunnels in Cloudflare are set up via the Cloudflare Zero Trust Dashboard. Does this answer your question?
Hi All,
I’ve got the tunnel configured, software installed on the SecuritySpy Mac, and the tunnel showing up as status “healthy” in my cloudflare account. Please advise on the next steps as the above instructions may be outdated? Thank you
Hi Dana, as far as I’m aware, the instructions above are still valid. Can you let me know exactly how they differ from what you are seeing?
I have added the ZeroTier IP address of the computer which is running SecuritySpy to the iOS SecuritySpy app, and the app is properly displaying all the cameras. My wife likes this solution. Thanks!
Great to hear that!
I’ve been using a Cloudflare tunnel to access my SecuritySpy web page for a couple of years without any issues. Thanks for the article!
Any plan to add OAuth, One Time Code options or more security options for exposing your server to the internet? The current solutions can be circumvented pretty easily. I would like to see more security features available.
SecuritySpy handles authenticated user sessions in a standard and secure way. The user logs in once via the login page, and the server responds with a session cookie that authenticates subsequent requests. SecuritySpy has built-in mechanisms to prevent abuse and hacking, such as automatically banning clients after a few failed login attempts, and automatic session expiry. The whole mechanism is already secure and certainly cannot be circumvented easily.
When you log on to your SecuritySpy server, this is a direct connection between the client software (e.g. web browser or iOS app) and the instance of SecuritySpy that is running on your own Mac. Connections do not run through, or get authenticated by, any server owned or managed by ourselves. Therefore, using OAuth for this isn’t really practical, as it would require users like yourself to set up and maintain their own OAuth server on their own machines. And the benefits offered (like allowing third-party apps to log on without sharing credentials, or supporting federated login) aren’t really applicable to SecuritySpy.
One Time Passcode (OTP) login is both less convenient (adds friction during login) and no more secure than the current method (as you’re simply shifting the security dependence from the web server to your email account, which may have its own vulnerabilities).
I do understand that exposing your SecuritySpy web server directly to the Internet can be a cause of concern, because even though it’s difficult to hack, it’s still possible for bad actors to try. The best way to prevent this is to implement one of the virtual network solutions outlined above (ZeroTier or Tailscale). This adds an additional layer of security, in that only devices that have been explicitly approved as members of the private network can even attempt a login to SecuritySpy. If you do this, the chances of being hacked are vanishingly small.
I’m not sure what I’m doing wrong here, but I’m trying to use ZeroTier so that my parents can access their cameras again after their Internet company “upgraded” them to a fake IP address.
I have set up ZT on the mac mini hosting SecuritySpy, and from my laptop I can access the “Managed IP” address and see securityspy e.g. on 172.26.X.Y:8001
However from the SS app on my phone, this doesn’t work. I have tried adding a New Server using 172.26.X.Y with port 8001 with/without username and password (and port) and I get a “Connection Failed” each time. 🙁
Two things to note that I hope will fix the problem:
Thanks that’s very helpful (and makes complete sense). I think that maybe I will try Cloudflare instead then, since my objective is to make this as simple for my parents and ideally they wouldn’t have to install ZeroTier. But I will check with them.
Interesting comments. I use CF ZeroTrust extensively. I found that implementing an “Allow” policy with a pin via email works well for SS, as I needed something to slow the brute forcers. FIY – it took Shodan about 1 day to find my SS instance, they are up to about 3.6M cams listed. To be fair, most are open IP cams. I set the Session/Content persist cookie timeout in CF Apps->Policy to something around a month, so I dont need to re-login during that period, works great. I am considering a proxy (really their DNS proxy function pointing in to their traffic sponges) for SS at CF to use their anti DDos, we shall see how bad it gets. I disabled the HTTPS checks inbound too, as there’s an automatic cert mismatch from a source SSL/TLS cert in to them, I just let them auto convert everything to https outbound, works great. I did explicitly name the tunnel, no “*” in the subdomain, so you cant pivot off the tunnel endpoint for SS off to another tunnel instance. One request please, are you considering any traffic, error, endpoint detection counter, etc type reporting, via SNMP (ick !) or maybe just a script for something like LibreNMS ? I dont see any hooks I can grab, I can write the agent, but dont see any JSON or XML to utilize ? It would really help to be able to use Grafana to graph trends in alerts, errors and so on. As always, rgds.