Our macOS CCTV software SecuritySpy saves all recordings to a local drive. By default, the Mac’s internal drive is used, but you can specify any other drive(s) you want to use for this purpose, for example an external drive connected by USB or Thunderbolt or a NAS (Network Attached Storage) drive on the local network.
Modern drives are very reliable, and for most users the small chance of data loss due to drive failure may not be too concerning. However, this could be more of a concern for more critical commercial applications, plus there is also the possibility than an intruder could damage or steal the drive.
To minimise the chance of data loss, there are a few basic steps that users can take, for example by using only high-quality drives from reputable manufacturers, securing drives with anti-theft devices, or using multi-disk RAID disk setups that provide fault-tolerance.
One further method to prevent data loss is to set up automatic offsite backup for the most important captured footage, so that this can be retrieved if the primary storage drive is compromised. There are a few ways to do this:
Use a cloud service such as Dropbox
Once Dropbox is installed on your Mac, the setup for this in SecuritySpy is very simple: for the most important cameras, set the Dropbox folder as the camera’s capture destination, under Preferences – Cameras – Setup in SecuritySpy. Dropbox will then automatically upload all captured files that SecuritySpy saves to the Dropbox folder.
- Advantages: easy setup; reasonable cost up to 2TB storage; Dropbox handles all file management to keep the server synchronised with the local Dropbox folder.
- Disadvantages: the Dropbox folder resides on the system drive, so you may need to have a significant amount of free space available on this drive for this to work well; since the cloud space is synchronised with the local space, you can’t have a different length of history at each location.
Use an FTP hosting account
There are many providers that offer this, including most web space providers. Once you have opened an account, you set up the server under Preferences – Uploads in SecuritySpy based on the FTP access information obtained from the FTP account provider. Then, you can use the “Upload” options under Preferences – Cameras – Continuous Capture and/or Preferences – Cameras – Motion Capture to choose which files to upload from which cameras.
- Advantages: generally low cost.
- Disadvantages: some users many find the setup difficult; there is no automatic server file management – removal of old files from the server must be done manually.
Use an Amazon S3 account
Once you have opened an S3 account, the setup is very similar to the FTP setup described above: you obtain the access details from Amazon, enter them into SecuritySpy, and choose which files to upload.
- Advantages: reasonable cost; relatively straightforwards setup; the server can be configured to automatically remove old files, independently from how old files are removed from local storage.
- Disadvantages: Amazon charges per GB of data storage, whereas Dropbox and most FTP providers charge a fixed fee for a certain fixed amount of storage. Therefore, S3 may be cheaper for some users but more expensive for other users, depending on how much space is used.
Amazon S3 Setup
Overall, Amazon S3 is the solution that will be suitable for the most users, due to its combination of ease of setup, flexibility and reasonable cost. Here is how to set this up in SecuritySpy:
The first step is to open an S3 account. Next, go to the Identity and Access Management (IAM) area of the dashboard, and create a new user, as shown here:

The user should have the following parameters:
Access type: Programmatic
Permissions: Attach existing policies directly
Policy name: AdministratorAccess
When the user has been created, you will be provided with an “Access key ID” and a “Secret access key”, which look like long strings of numbers and letters. Make a note of these two strings.
Next, go to the S3 Management Console and create a new bucket. A bucket is simply a container of files, just like a folder. The bucket name can be anything you like, as long as the name hasn’t been taken by another user.

Then, in SecuritySpy, go to Preferences – Uploads, add a new server, and enter the access key ID, secret access key, and bucket name.
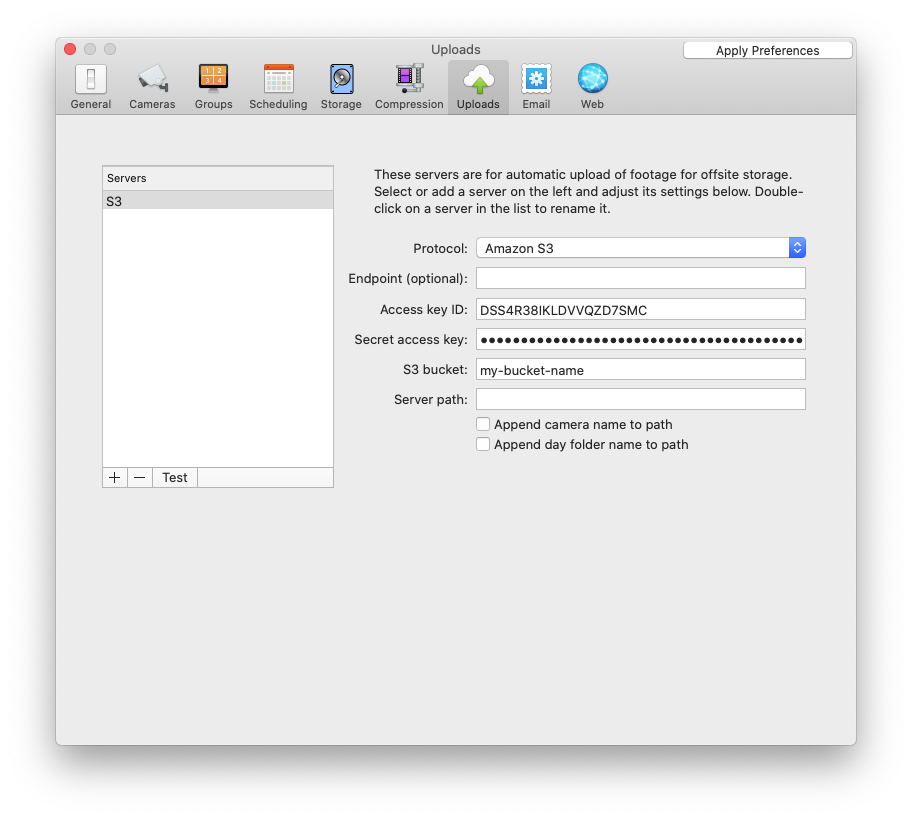
Click the “Test” button, and you should see a message that the file was uploaded successfully.
Use the “Upload” options under Preferences – Cameras – Continuous Capture and/or Preferences – Cameras – Motion Capture to choose which files to upload from which cameras.
Finally, to limit the amount of storage space used on the S3 server, you might like to configure S3 to delete files older than a certain number of days.
Final thoughts
- While S3 has reasonable costs, it does charge per gigabyte of data, so the less data you store there (i.e. the fewer days’ worth of footage you keep on the server), the less you will pay.
- When using FTP or S3, you can use the Upload Status window (available from the Window menu in SecuritySpy) to check on the progress of current file uploads.
- The amount of data you can upload depends on the upload speed of your Internet connection (which is typically much lower than the download speed). Check the Upload Status window to see if files are being created faster than they can be uploaded.
I’ve been very pleased with uploading captures to CameraFTP — reasonably cheap, reliable, great support, and while it’s FTP, they do automatically delete old files.
Many thanks for your input, this looks like a great service. However I see that the video/image resolution is quite limited, even for the “professional” plans (maximum 1920×1080). Do you know what happens if your camera resolution is higher than this?
My cameras have options to drop the resolution when streaming, which I’ve utilised. I assume CameraFTP has regular checks that you’re keeping within resolution and frame rate.
Nice post, tips. A few things I wanted to add. I love AWS S3 but have found Wasabi to be a lower cost and equal to greater performance S3 compatible solution. The process defined above would be nearly identical, the Wasabi setup is slightly different but same concepts (buckets, keys, etc.). Keep in mind Wasabi doesn’t charge in ingress or egress.
It might seem obvious, but I have been using iCloud storage – its captured locally, then the folder is replicated onto iCloud and footage is available to view across the iOS devices I have.
Thanks, this sounds like a good solution.