SecuritySpy, our fully-featured video surveillance solution for the Mac, offers a built-in web server that you can use to access your CCTV system from the Internet. For ease of setup, SecuritySpy allows you to choose your own free domain name in the form name.viewcam.me, which is used to access your system. SecuritySpy will automatically keep this domain updated with your current public IP address whenever it changes (this is called DDNS), and it will automatically generate and renew a free SSL certificate for secure HTTPS access.
However, some users may want to use their own domain name instead of the viewcam.me name provided. One way to do this would be to purchase a static IP address from your ISP, to which you point your domain, and then purchase and install your own SSL certificate for SecuritySpy. The downside to doing this is the cost, setup, and the fact that you will have to manually renew your certificate whenever it expires.
There is a better solution that allows you to use your own domain but that does not require a static IP address, incurs no ongoing costs, and offers automatic renewal – here’s how to set this up:
1. Zonomi Account Setup
Firstly, sign up for a DNS hosting account with Zonomi. A free account provides DNS hosting services for a single domain, which is all you need for this purpose.
Check that your domain appears under the Zone List section of the Zonomi Control Panel. If not, add it there.
In the DNS API section of the Zonomi Control Panel, you will find your Zonomi “API key”, which is a long string of letters and numbers – make a note of this.
2. Set Name Servers for Your Domain
Next, set your domain to use Zonomi’s name servers. This puts Zonomi in charge of providing the IP address that your domain name points to, when a client attempts to look it up in order to make a connection. To do this, log on to the control panel provided by the company you purchased your domain from, locate the setting to provide name servers, and provide the following server addresses:
ns1.zonomi.com
ns2.zonomi.com
ns3.zonomi.com
ns4.zonomi.com
It’s fine if you can enter only two of these rather than all four. Note that this change may take up to 24 hours to take full effect.
3. Install and Configure Certy
Certy is a small companion app that handles DDNS and automatic SSL certificate creation. It can be purchased from the Mac App Store for a one-off small fee.
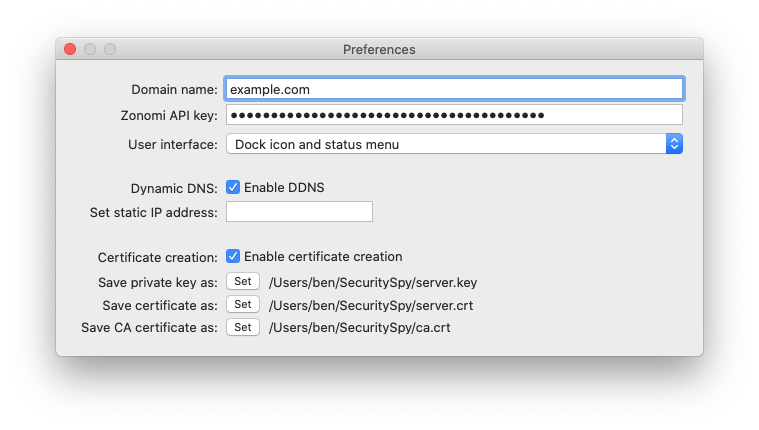
In the Certy Preferences window, set the following:
- Enable both the DDNS feature and the certificate creation feature
- Enter your domain name, or subdomain thereof (e.g. example.com or jane.example.com)
- Enter the Zonomi API key that you obtained in step 1
- Certy creates three files: a private key, a server certificate, and a Certificate Authority (CA) certificate; click the Set button for each in turn, and choose to save each file within the SecuritySpy folder within your Home folder (i.e. /Users/username/SecuritySpy/)
Your Certy settings should look something like this:
If everything has worked as it should, the main Certy window will show green indicators for both the DDNS status and the certificate status, like this:
4. Set Certy as a Startup Item
Finally, you will need to ensure that the Certy app is always running so that it can do its work to continuously update the IP address of your domain and create new SSL certificates when required.
Go to System Preferences > Users & Groups, and firstly make sure the padlock icon at the bottom of the window is unlocked; if not, then click it and enter your password to unlock it. Then, select your user account on the left, click the “Login Items” tab on the right, and drag Certy into the list of applications that are set to open upon login. You may also like to turn on the “Hide” option so that Certy automatically starts hidden in the background. Make sure to leave Certy running and do not manually quit it.
5. Access from the Internet
Note that Certy takes over both DDNS and certificate creation functions, however you will still need to ensure your SecuritySpy is available to the Internet via port forwarding in your router. In most cases, this can be handled automatically by SecuritySpy by simply turning on the “Allow access from the Internet” options under Preferences > Web.
A secure connection to your SecuritySpy server can then be made using your domain name with the external HTTPS port that has been configured, e.g. https://example.com:8001