In a now-famous experiment initiated by the Washington Post, world-renowned violinist Joshua Bell performed undercover in a busy metro station. Using a priceless Stradivarius violin, Bell performed music that he normally plays in front of large concert audiences around the world. The result? Hardly anyone paid much attention to the violinist, or tossed many coins into the open violin case by his feet. The experiment provides a fascinating insight into the importance of context in our experiences of the events around us.
The performance was recorded, but only by a single low-quality camera. What if we wanted to record the experiment properly, from multiple angles, in order to analyse every aspect of the event and people’s reactions? This is the kind of task that CaptureSync is perfect for, and the setup of this hypothetical recording is detailed below.
Layout
Firstly we will consider the layout of the space, and where the best camera angles will be:
As you can see, the violinist is by the wall on the left of the diagram, with people potentially approaching from the top, right, and bottom. The four cameras are carefully positioned to capture people walking towards the musician from every angle. The Mac that is doing the recording is positioned at point A, and can therefore connect to the two cameras at that position using short ethernet cables. These two cameras capture people approaching from the top and from the right. The other two cameras connect wirelessly, as it would otherwise be difficult to install ethernet cables to them. One of them points to the violinist directly, and the other captures people approaching from the bottom. It is also relatively simple to place a high-quality microphone near the performer, attached by cable back to the Mac at point A.
Cameras
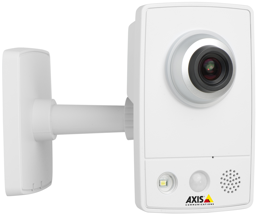
We have chosen Axis M1033-W cameras for this task. They are physically small, so unlikely to be spotted, and provide good video quality in the reasonably well-lit conditions within the subway station. They can be connected either wired or wirelessly, which will help with the flexibility of setup.
Mac
Being small and powerful, A 13-inch MacBook Pro is perfect for this task.
Hub
In order to connect everything together, we will use an AirPort Extreme. If you are confident with setting up networks and IP addresses, this is strictly not required, as you can connect the cameras directly to the Mac in various ways, but using an AirPort Extreme will make the setup far easier.
Network Setup
Using Axis cameras and an AirPort router makes the setup straightforward, because these devices support auto-configuration protocols such as Bonjour and DHCP. The two wired cameras are easy: simply plug them into the back of the AirPort, using two of the three available ethernet ports. The third ethernet port is connected to the MacBook Pro (note that newer MacBook Pro models require a Thunderbolt-to-Ethernet adaptor for this). As for the wireless cameras, the setup is as follows:
- Open the AirPort Utility application that you will find in the /Applications/Utilities/ folder.
- Edit the AirPort device, click on the Wireless tab, and set a name and password for its wireless network.
- Check that the mode is Create a wireless network and the security is WPA2 (these are the default settings).
Then, for each wireless camera, do the following:
- Initially connect the camera to the AirPort using an ethernet cable.
- Use our Network Device Finder app to locate the camera, and double-click to open it in a web browser.
- Locate the wireless settings and enter the network name (SSID) and password that you created above.
After this setup, you can remove the ethernet cable and the cameras will be able to connect wirelessly.
CaptureSync Setup
The final setup step is to add the cameras to CaptureSync:
- Open CaptureSync, go to Preferences, and click the Video tab.
- Use the plus button to add a new network device.
- Next to the Address box, you will see a small menu that lists Bonjour devices: click on it and select a camera from the list.
- Enter the camera’s username and password (for Axis, “root” and “root” by default).
- Select H.264 RTSP as the format, and choose a suitable frame rate.
Exit from the Preferences window and you should see all your cameras displayed in the video window. CaptureSync is now ready to record.
CaptureSync will record all cameras synchronised together, to a single movie file that contains each video and audio feed in separate tracks. This is perfect for archival and analysis. Or, the captured footage can be imported into software such such as Final Cut Pro for editing.


